
Stable Diffusion(Tensorflow ver.) 누구나 쉽게 따라하기
STable Diffusion이란?
2022년에 출시된 딥러닝, text-to-image 모델이다. 주로 텍스트 설명에 따라 세부 이미지를 생성하는데 사용되지만, inpainting, outpainting, image-to-image 등 다른 작업에도 적용 할 수 있다. Denoising Diffusion Probabilistic model을 기반으로 만들어졌으며, 일반 사용자도 무료로 이용이 가능한 것이 큰 장점이다.
사용방법
깃허브 레포지토리를 클론한다.
git clone https://github.com/divamgupta/stable-diffusion-tensorflow.git
이제 관련 패키지를 설치해야 하는데 레포지토리에 나와있는 버전으로 하면 오류가 발생해서 해결한 방법으로 포스팅하겠다.
코드를 돌린 환경의 패키지 버전은 아래와 같다.
cudatoolkit==11.0
cudnn==8.0.5
tensorflow-gpu==2.4.0
h5py==2.10.0
ftfy==6.1.1
regex==2022.9.13
tensorflow-addons==0.17.1
tqdm==4.64.1
Pillow==9.2.0
패키지까지 설치가 되었으면 코드를 돌려보자! 방법은 코드를 작성해서 파일을 실행하거나 아니면 .py 파일을 실행해도 된다. 먼저 코드 작성은 이렇게 작성하면 된다.
from stable_diffusion_tf.stable_diffusion import StableDiffusion
from PIL import Image

generator = StableDiffusion(
    img_height=512,
    img_width=512,
    jit_compile=False,
)
# for text to image
img = generator.generate(
    "An astronaut riding a horse",
    num_steps=50,
    unconditional_guidance_scale=7.5,
    temperature=1,
    batch_size=1,
)

# for image to image :
img = generator.generate(
    "A Halloween bedroom",
    num_steps=50,
    unconditional_guidance_scale=7.5,
    temperature=1,
    batch_size=1,
    input_image="/path/to/img.png"
)


Image.fromarray(img[0]).save("output.png")
두번째 방법은 터미널 창에 이렇게 적어주면 알아서 만들어 준다.
python text2image.py --prompt="An astronaut riding a horse"
여기서 파일을 저장할 경로를 추가하고 싶으면
python text2image.py --prompt="An astronaut riding a horse" --output="my_image.png"
이렇게 적어주면 된다.
image-to-image는
python img2img.py --prompt="a high quality sketch of people standing with sun and grass , watercolor , pencil color" --input="img.jpeg"
이렇게 input에 이미지를 넣어서 생성할 수 있다!
TypeError: get_file() missing 1 required positional argument: 'fname'
혹여나 이런 에러가 발생한다면 ./stable-diffusion-tensorflow/stable_diffusion_tf 이 경로에서 stable_diffusion.py 에 239번째 줄에서 get_file() 메서드에 fname="" 인자를 아무렇게나 적어주면 된다.
결과
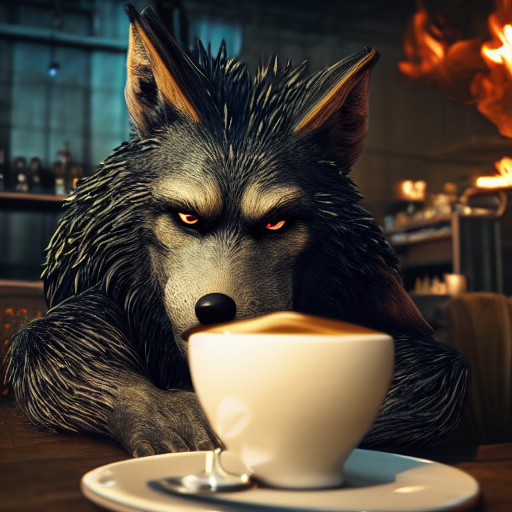
python text2img.py --prompt="A epic and beautiful rococo werewolf drinking coffee, in a burning coffee shop. ultra-detailed. anime, pixiv, uhd 8k cryengine, octane render" --output="my_image.png"
이렇게 키워드를 검색한 결과 이런 고퀄리티의 이미지를 생성해 주었다,,,ㄷㄷ
댓글남기기